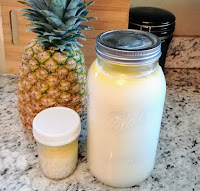
The process requires milk to be heated to 180°F. This will kill the bacteria in the milk so the whey proteins will denature and coagulate enhancing the viscosity and texture of the yogurt. Then the milk is cooled between 110°F-115°F and inoculated with active cultures from the last batch of yogurt, or some store-bought yogurt containing active cultures. The final step requires the milk to incubated for several hours to produce yogurt.
Equipment:
- Soup pot
- Spoon or whisk
- Precision instant-read thermometer
- Sous Vide Immersion Heater/Circulator
- Heat safe container
- Clean Mason jar(s) with lids and rings
- Colander (optional)
- Cheesecloth, large dinner napkin, or large handkerchief (optional)
- 2 liters (½ gallon) of whole milk, or 2% milk
- ¼ cup of yogurt with active cultures at room temperature. This can be the remainder of the last batch of homemade yogurt or some store-bought natural yogurt with active cultures. (I don't recommend using flavored store-bought yogurt because it's hard to know what other additives it might have.)
- Setup your heat-safe container and fill it with the amount of water recommended by the manufacturer of your immersion circulator.
- Set the temperature to 110°F/43°C
- Set the time to a minimum of 8 hours. The maximum number of hours should not exceed 24. The longer the yogurt ferments the more tang it will have. If you want a less tangy or thick yogurt, ferment for around 8 hours. For a thick, tangy, and probiotic-rich yogurt, go closer to 24 hours. (I like it at about 12 to 18 hours)
Directions:
- Pour the milk into the pot and place it over medium-high heat. Stir the milk frequently to prevent it from scorching on the bottom.
- Use the instant-read thermometer to watch the temperature and bring it up to 180°F. When it reaches 180°F, remove from the heat and set the pot in a sink full of icy cold water to let the milk cool down to between 110°F and 115°F, stirring regularly for an even cool down.
- Once the temperature drops between 110°F and 115°F, remove the pot of milk from the ice water and set it on the counter.
- Scoop out about a cup of warm milk and mix it with the plain yogurt you have at room temperature.
- Gently, but thoroughly, stir this milk/yogurt mixture back into the rest of the milk using a side-to-side motion.
- Pour this mixture into 2 or 3 quart-sized Mason jars. (I have ½ gallon Mason jars, so I use one ½ gallon jar and if I have a little extra milk mixture, I pour it into a 4 ounce Mason jar.)
- Place the lids on the jars and put the rings on so they are snug, but not tight. I recommend screwing the rings with just 2 fingers until you meet a little resistance. If the rings are too tight the glass jars could break.
- Place the jar(s) in the water bath and walk away.
- When the timer on the immersion circulator goes off, remove the jars, let them rest for 30 minutes and then chill them in the refrigerator.
- The yogurt will be pretty thick when it comes right out of the fermentation, and it will thicken even more as it chills.
Enjoy the yogurt in all your favorite recipes, served over granola and topped with fruit, and so on. Just be sure to save that last ¼ cup of yogurt from this batch for your next batch.


No comments:
Post a Comment
Please leave your feedback and comments on recipes.